Small electronics enclosures must resist rain, splashes, dust, and sudden temperature changes. Yet a completely sealed housing can trap heat or develop pressure differences as the air inside warms and cools. A pressure-equalization vent can help manage these changes while limiting water entry, when correctly selected and installed. Small details matter. The term Adhesive Vent Waterproof points to vents that attach directly to an enclosure, avoiding the need for a threaded fitting. But “waterproof” does not mean suitable for every device or exposure.
This guide to seven Waterproof Adhesive Vents compares practical factors, including water-ingress ratings, airflow, membrane construction, adhesive type, and usable temperature range. Check the product datasheet and mounting instructions rather than relying on a product title alone. Surface preparation matters: dust, texture, coatings, and curved panels can affect how well an adhesive seal holds. A clean, flat mounting area is usually easier to evaluate. Still, actual performance depends on the enclosure and installation.
No vent is magic. Consider where the device will operate, how often it faces spray, and whether condensation is a concern. A vent that suits a handheld instrument may not fit an outdoor control box. The best choice balances protection and pressure relief, with clear specifications and a sensible fit for the enclosure. If the consequences of water ingress are serious, verify the complete assembly under relevant conditions instead of assuming the vent’s rating guarantees protection.
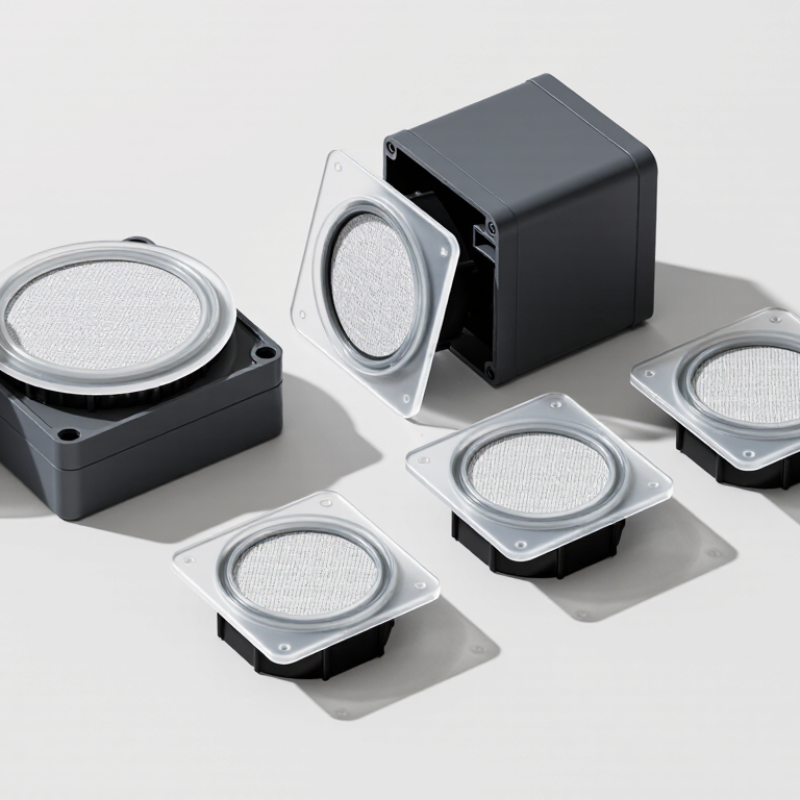
An adhesive vent is a small membrane-covered opening bonded to an electronics enclosure. Its microscopic pores let air pass while resisting liquid water and dust. When a device heats up or cools down, internal pressure changes. The vent helps equalize that pressure without leaving the opening fully exposed. It also gives water vapor a path to escape. Small part, important job.
IEC 60529, the international enclosure-protection standard, defines IPX7 testing as temporary immersion in water up to 1 meter for 30 minutes. Its IP6X test requires an enclosure to be dust-tight. These ratings apply to the tested enclosure, not to a vent by itself. A vent’s adhesive, membrane, housing design, and installation all affect the final result. A rating on paper is not a guarantee after poor assembly.
In practice, a vent may sit behind a molded grille on a handheld meter or control box. Dust, skin oils, and uneven surfaces can weaken the bond. That detail is easy to miss. Surface preparation and careful placement matter, yet real-world aging can still surprise designers. Check the complete device under its intended test conditions, including temperature changes and exposure to water. A vent manages pressure; it does not make an enclosure invulnerable.
A reliable electronics vent does more than block splashes. Its membrane should let pressure equalize while limiting liquid water and dust. This matters when a sealed enclosure heats in sunlight, then cools quickly. Without pressure relief, seals may strain or moisture may be drawn inward.
Look for a stated ingress rating and test conditions, not just the word “waterproof.” Check that the adhesive suits the enclosure material and expected temperature range. Surface preparation matters: dust, oil, or a curved mounting area can weaken the bond. Placement matters too. A vent near a drip path may face more water than its rating suggests. Small details count.
Tips: Clean and dry the mounting surface, then press the vent evenly. Avoid covering its membrane with paint, labels, or sealant. After installation, inspect the edges and test the enclosure under realistic conditions. One detail is easy to miss: a vent can protect against water yet still perform poorly if airflow is obstructed. Ratings help, but they do not replace application testing.
A waterproof adhesive vent should match the device’s pressure changes, exposure, and mounting surface—not just its enclosure rating. A sealed handheld unit may need little airflow, while a sun-heated outdoor controller can build pressure as internal air expands. Check the vent’s airflow rate at a stated pressure difference, water-entry pressure, operating temperature, and resistance to oils or cleaning fluids. Then confirm the adhesive bonds to the actual housing material. A good datasheet is useful, but it cannot replace testing on your device.
IEC 60529 defines the IPX7 immersion test as temporary immersion in water, generally up to 1 metre for 30 minutes. That result applies to the tested enclosure configuration; it does not automatically certify an adhesive vent or a finished product. Select the required protection level for the real exposure, such as rain, washdown, or brief immersion. Also consider dust, salt spray, and repeated temperature swings. Small mounting details matter: a curved panel, textured plastic, or narrow bonding edge can weaken the seal. It is easy to over-focus on ratings. In practice, the installation may be the weak point.
Tips: Clean and dry the mounting area, follow the specified application pressure, and allow the adhesive its full cure time. Test samples on the production housing. If you cannot reproduce the field conditions, your confidence should stay limited.
A reference chart for water-ingress test exposure times in IEC 60529 IPX ratings—not a ranking of vent products.
The test methods differ by rating, so exposure times are not a direct measure of protection strength. An adhesive vent’s effect on protection depends on the complete device enclosure and its installed vent; check the assembled device’s tested rating against its actual exposure conditions.
Seven Waterproof Adhesive Vent Options Compared
Adhesive vents balance water resistance with pressure equalization, but their performance depends on the membrane, adhesive, and enclosure surface. Seven common choices include ePTFE membrane, polyurethane membrane, hydrophobic nonwoven, oleophobic ePTFE, low-profile dome, dual-layer membrane, and reinforced patch vents. ePTFE often offers strong airflow; oleophobic treatments help resist oils. Nonwoven options may cost less, while reinforced patches suit rougher handling. Trade-offs matter. A thicker vent can restrict airflow, and even a good membrane can fail on dusty, curved, or low-energy surfaces.
For a useful benchmark, IEC 60529 defines the IPX7 immersion test as temporary immersion in water up to 1 meter for 30 minutes under specified conditions. That rating tests an enclosure, not the adhesive vent alone. Compare airflow, water-entry pressure, adhesive compatibility, and aging results from the supplier’s technical data. A vent tested on a smooth sample may behave differently on a textured, warm electronics housing. This is easy to overlook.
Tips: Clean and dry the mounting area, then press the vent firmly across its full adhesive ring. Test the finished enclosure after heat, humidity, and vibration exposure. Small detail. Real consequences. One imperfect point: lab results cannot fully predict field use, so validate the selected vent on the actual housing.
Installing a waterproof adhesive vent starts with the enclosure surface. Clean away oil, dust, and release agents, then let the area dry fully. A fingertip can leave enough residue to weaken the bond. Apply the vent to a flat panel, press evenly across its full perimeter, and avoid stretching the membrane. Follow the specified temperature and cure time; early water exposure can undermine adhesion. Small detail. Big consequence.
IEC 60529 defines the IPX7 immersion test as up to 1 meter of water for 30 minutes. That rating describes a defined test condition, not unlimited immersion or years of service. It also does not prove that a vent will maintain the same airflow after dust, salt, or detergent exposure. Check the enclosure’s complete test results, including the vent and its bonded edge. A membrane may resist water while still allowing pressure equalization, but airflow can vary with membrane area and pressure difference.
During maintenance, inspect for lifted corners, cracks, trapped debris, and blocked openings. Clean gently; sharp tools and aggressive solvents can damage the membrane or adhesive. Replace a vent if its edge has loosened or water entry is suspected. Keep records of installation date and exposure conditions. Honestly, inspection alone cannot predict remaining service life, so periodic environmental testing may be needed for critical equipment.
A practical comparison of common adhesive-mounted vent constructions. “Best” depends on the enclosure, exposure, airflow requirement, and tested assembly; the descriptions below are general selection guidance, not product-specific ratings.
| Vent type | Typical construction and use | Installation considerations | Common performance limits | Maintenance checks |
|---|---|---|---|---|
| 1. Standard ePTFE adhesive vent patch | Microporous expanded PTFE membrane on an adhesive carrier; used to equalize pressure while resisting liquid-water entry when correctly selected and installed. | Apply to a clean, dry, flat surface with a suitable vent opening beneath the membrane. Keep the membrane area clear of coatings, sealants, and enclosure features. | Airflow and water-entry resistance depend on membrane design, exposed area, pressure difference, and the complete enclosure. Not intended to act as a liquid-water barrier under every pressure or immersion condition. | Check for lifting edges, punctures, contamination, and blocked openings. Replace a damaged or detached patch rather than covering it with sealant. |
| 2. Oleophobic ePTFE adhesive vent | ePTFE membrane treated to improve resistance to oils and some low-surface-tension liquids; useful where splashes may include oily contaminants. | Confirm the treatment is compatible with the expected fluids. Follow the specified surface preparation and bonding instructions. | Oleophobic treatment does not make the vent resistant to every chemical or fluid. Exposure, pressure, and contamination can still reduce performance. | Inspect for oil films, chemical residue, and adhesive degradation. Clean only by a method approved for the vent and enclosure materials. |
| 3. High-airflow adhesive membrane vent | A vent design with greater effective membrane area or lower airflow resistance, selected when pressure equalization is a priority. | Provide adequate clearance around the vent and an unobstructed path through the enclosure wall. Avoid placing it where a gasket or internal component blocks airflow. | Higher airflow capability does not automatically mean higher water-entry resistance. Verify both airflow and water-protection requirements for the intended conditions. | Check that dust, fibers, or residue have not covered the active membrane area. Do not brush or scrape the membrane. |
| 4. Reinforced or supported adhesive vent | Membrane combined with a protective support layer or carrier, often chosen where handling or abrasion protection is important. | Orient and install the supported side as specified. Ensure that the support structure does not obstruct the vent opening or create a path around the adhesive seal. | Support layers can affect airflow and may not protect against sharp objects, sustained abrasion, or excessive mechanical loading. | Look for tears, crushed areas, delamination, and damage around the bonded perimeter. |
| 5. Miniature adhesive vent | Small-format vent for compact housings, sensors, and small electronic modules where mounting space is limited. | Use a correctly sized opening and maintain the required adhesive land around it. Small vents are particularly sensitive to placement and surface contamination. | Limited membrane area generally restricts available airflow compared with larger vents. A small vent may not equalize pressure quickly enough for a large or rapidly changing enclosure. | Inspect closely for edge lift, blocked openings, and damage. Replace if the adhesive perimeter is compromised. |
| 6. Large-area or rectangular adhesive vent | A larger membrane area intended for housings needing more airflow or a broad mounting footprint. | Use a flat, sufficiently large bonding surface. Press the full adhesive perimeter into contact and avoid folds, wrinkles, and enclosure seams beneath the seal. | Requires more clear mounting space and can be more exposed to handling or impact. A larger patch does not by itself establish an enclosure ingress-protection rating. | Check the entire perimeter, not just the corners, and keep the exposed membrane free from dirt and overlying parts. |
| 7. Custom die-cut adhesive membrane laminate | A membrane and adhesive laminate converted to a specified shape for a particular enclosure layout or production process. | Validate the cut geometry, adhesive compatibility, vent-opening alignment, and application process on the actual enclosure material. | Performance is specific to the chosen membrane, adhesive, dimensions, and installation. A custom shape or adhesive alone does not guarantee a particular water-ingress result. | Use consistent inspection criteria during production and service. Check alignment, complete bonding, contamination, and membrane damage. |
Important: Adhesive vents are not interchangeable with a certified enclosure rating. Confirm the vent’s documented airflow, water-entry, temperature, chemical-compatibility, and adhesive data, then test the complete enclosure in its intended configuration. Installation conditions and aging can affect performance.
„Thanks to the LUVIR technology, the solder resist process could be switched directly from the previously used mask exposure to direct exposure. As an outstanding digital solution on the market, this technology has been able to demonstrate fast process times and superior quality on our certified conventional ink in production. This allowed us to fully digitize the solder mask process at low cost – without process or ink adjustments. An excellent benefit to our production in Rot am See.“
Ralf Göhringer (Head of Production WE Rot am See)
I would definitely recommend the Limata machine and team for a future company purchase
Michael Greenaway
Compunetics Inc.
“The Limata ldi has been amazing!! Best thing we did was buy this machine”
Richard Brady
GM
Circuitlabs
“Since 2019, we have been running the Limata X1000 LDI system (including LUVIR for solder mask imaging) in daily production as an addition to our current process with film. The machine was capable of properly exposing Taiyo PSR-4000 BN (DI) solder mask types on normal to high-copper boards using a new and unique direct imaging process. The machine operating interface is very user friendly which allowed for a quick technical training curve. The pre-registration processing reduced several seconds of production time at every print. Limata support and service staff is incomparable. They supported our team every step of the way at basically any time of the day or night, with literally, an immediate response time, customizing the software interface to best fit our Operations and needs.
We have exposed more than 8,000 prints since end of October, on various solder mask colors and some resist film panels. Limata, has proven to be very capable and innovative. They are a strong contender in the industry.
We have very much enjoyed this project, and working with the team!
Thank you Limata for the continued support and being a part of our growth.”
Bill Sezate
Vice President, GM
Summit Interconnect
As a replacement to our current contact exposure process with film, the LIMATA X2000 system including LUVIR-Technology was capable of properly exposing non-LDI solder mask types using a direct imaging process. The machine offers cutting edge software with a very intuitive operating interface which allowed for quick technician training curve. The dual drawer system combined with pre-registration processing reduced several seconds of production time at every machine cycle. Limata support and service staff is world class. They added software patches to keep production running at shortest possible response times, customized the software interface to best fit our in-house Operations system, and even wrote a step-by-step machine processing manual. As a result of the project, we have exposed more than 16,000 times on various product types and solder mask brands/colors. Limata, in a very short timeframe as a company, has definitely shown they are truly innovative and will be challenging the industry of direct imaging for the top spot.
Kevin Beattie
Process Engineer
TTM Technologies
Forest Grove Division