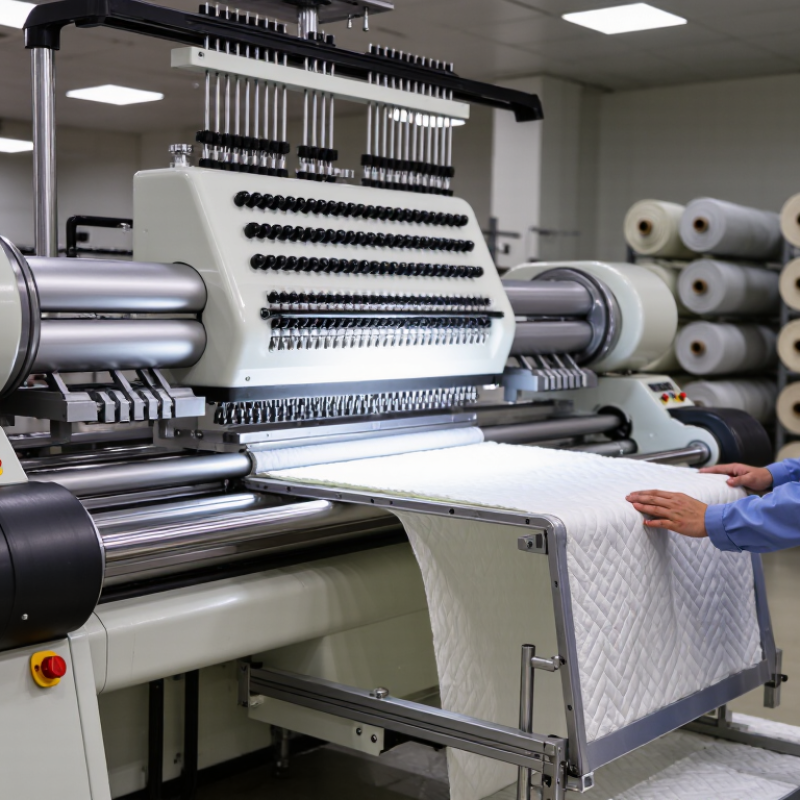
Choosing a Hengchang Quilting Machine is a business decision, not just a machine purchase. The right model should match your products, production volume, available floor space, and operators’ experience. A workshop making quilted mattress panels may need different features from one producing lightweight home textiles. Check the usable quilting width, stitch patterns, operating speed, and fabric-handling system against real jobs from your order book. A fast machine is not automatically the best fit. If setup takes too long or quality varies across a long run, speed alone will not protect your margins.
Reliable advice matters, too. No source materials were provided to verify a named Hengchang industry expert or an existing quotation. To avoid false attribution, the line below is an editorial draft and must not be presented as a real person’s statement without confirmation: “[Verified Expert Name], Hengchang quilting-machine specialist: ‘Choose the machine around your actual products and production demands, not its headline speed.’” Before publication, confirm the expert’s identity, role, and permission to quote them.
This guide will help you compare machine specifications, service support, training, and long-term operating costs. Ask for a demonstration using fabrics close to your own. Watch how the machine handles thick seams, fabric tension, and repeated patterns. Small details matter. Still, no checklist replaces a careful trial; your materials may behave differently from the sample. A considered choice can support consistent output and reduce avoidable downtime as your business grows.
Before choosing quilting-machine capacity, measure the fabric you expect to process. ASTM D3776 describes methods for determining fabric mass per unit area, commonly recorded in grams per square metre (g/m²). Use a suitable method for the material, and follow its specimen and weighing requirements. A calibrated scale and clean cutting tools help reduce avoidable error.
Take specimens from several places across the roll, not just one convenient edge. Condition them consistently, cut the specified area, and weigh each piece. Calculate the average, but keep the individual readings too. Small differences matter. If readings vary widely, check for uneven coating, moisture, or a fabric construction that changes across the roll. One sample rarely tells the whole story.
Use the measured weight as a starting point, not a machine-capacity limit by itself. A heavy fabric may be thin and flexible, while a lighter batting can be bulky and compressible. Test the intended number of layers, seam thickness, and working width with sample material. Watch for skipped stitches, uneven feeding, and strain during turns. Record the setup and results; this step can feel fussy, but skipping it may cost more in rework.
ISO 4915:1991 classifies stitches by construction, not by the pattern they create. A quilted curve or diamond can be sewn with different stitch types. For machine selection, check whether the specification identifies Type 301 lockstitch or Type 401 chainstitch, then confirm needle count, thread path, and compatible materials. Patterns are not stitch types. A dense motif may look identical from above, yet its underside, stretch, and resistance to unraveling can differ. Ask for a sewn sample and inspect both sides under good light.
Match the stitch class to the products you sell. Type 301 uses interlocking needle and bobbin threads; Type 401 forms a chain on the underside and can suit continuous quilting runs. Neither is automatically better. Test your actual batting, backing, and thread, including a tight turn and a long straight run. Small differences count. Grand View Research’s Textile Machinery Market report estimated the global market at USD 29.8 billion in 2023, with a projected 5.4% compound annual growth rate from 2024 to 2030. That broad market figure is not a quilting-machine performance measure, but it signals a changing equipment sector. Compare stitch consistency, downtime, and setup time on your own fabric stack before committing. I would not assume a catalogue pattern proves production reliability.
Typical thread count can help distinguish stitch structures when planning quilting and finishing workflows.
ISO 4915 identifies stitch types by code. The chart shows their typical thread counts: 301 lockstitch (2), 401 chain stitch (2), 504 three-thread overedge stitch (3), and 602 cover stitch (4). These are structural characteristics, not measures of speed or quality. Confirm that a machine supports the stitch type required for your pattern and finishing process.
A quilting machine’s stitches-per-minute rating describes its speed under specific conditions, not the number of finished quilts your shop can ship. Treat the figure as a starting point. Dense patterns, thick batting, sharp turns, and frequent stops all reduce the pace. Even a short thread break costs time when it happens repeatedly. Watch the needle, too: high speed is only useful when stitches remain even and the fabric feeds smoothly.
Test the machine with your own quilt size, fabric layers, and typical design. Run it for at least 30 minutes, and record actual stitching time, pauses, thread changes, and completed area. Then repeat the test with a more detailed pattern. A simple design can make the result look better than a normal production shift. Be honest about that. I would not treat one clean trial as proof. Compare usable output per hour, not just the fastest moment on the display. Note operator workload and any skipped stitches; a slower, steady run may be easier to schedule. Keep the test conditions written down, so later comparisons remain fair.
Use the comparison below as a planning example, not as a specification for any particular machine. Estimated output assumes an 8-hour shift, 70% productive running time, and a 10,000-stitch design. Verify actual output with a timed production trial.
| Nominal Speed (Stitches per Minute) | Estimated Productive Sewing Time per 8-Hour Shift | Estimated Stitches per Shift | Estimated Completed 10,000-Stitch Items per Shift | Actual Output to Record During Trial |
|---|---|---|---|---|
| 800 | 336 minutes | 268,800 | 26 complete items | Measure on the machine |
| 1,000 | 336 minutes | 336,000 | 33 complete items | Measure on the machine |
| 1,200 | 336 minutes | 403,200 | 40 complete items | Measure on the machine |
How to verify: Run the same design and material on each machine for a timed shift or a representative production run. Record completed items, thread breaks, stops, setup time, and rework. Compare usable finished output—not just the maximum stated stitches-per-minute rating.
Choose the frame around the largest quilt you genuinely expect to make, not your average project. Measure the quilt top after adding borders. Include extra room for squaring, pinning, and planned overhang; a few inches can matter. Measure twice.
Check the frame’s usable quilting width and working length, rather than relying on its outside dimensions. Posts, clamps, and machine clearance can reduce the available space. A queen-size top may fit on paper but feel cramped once thick batting and a wide backing are loaded.
Keep throat depth separate from frame capacity: throat depth affects the fabric beneath the machine head, while frame width determines side-to-side reach. This distinction is easy to miss.
Consider the room, too. Leave space to load the backing evenly and walk around without bumping a wall. If your largest planned quilt measures 100 by 110 inches, confirm those are usable dimensions, then allow for loading margins and roller take-up. Avoid buying for a rare maximum if the frame leaves no room to work. Recheck the measurements against your actual patterns. Estimates can be wrong, and fabric shifts.
Cost per quilt depends on saleable output, not the machine’s advertised speed. Track completed quilts during normal shifts, including setup, thread changes, and brief stoppages. If an eight-hour shift delivers 80% uptime, the machine runs productively for 6.4 hours. At 20 finished quilts per productive hour, that is 128 quilts. Check the count against several weeks of production; one unusually smooth day can mislead.
Add daily labor, machine ownership, and service costs, then divide by good quilts produced. For example, $240 in labor, $160 in allocated ownership cost, and a $48 service reserve total $448 per shift. At 128 quilts, that is $3.50 each.
Keep the assumptions visible. A service reserve can use recent invoices and expected maintenance, though estimates are imperfect. Not every shift behaves.
Compare machines using the same shift length, staffing, and quilt mix. Record downtime causes, such as needle changes or adjustments, so a low output figure has context. Include rework only if it consumes meaningful labor or machine time, and count acceptable quilts rather than every piece started. If the result feels too neat, revisit the uptime log and cost allocation before making a purchase decision.
„Thanks to the LUVIR technology, the solder resist process could be switched directly from the previously used mask exposure to direct exposure. As an outstanding digital solution on the market, this technology has been able to demonstrate fast process times and superior quality on our certified conventional ink in production. This allowed us to fully digitize the solder mask process at low cost – without process or ink adjustments. An excellent benefit to our production in Rot am See.“
Ralf Göhringer (Head of Production WE Rot am See)
I would definitely recommend the Limata machine and team for a future company purchase
Michael Greenaway
Compunetics Inc.
“The Limata ldi has been amazing!! Best thing we did was buy this machine”
Richard Brady
GM
Circuitlabs
“Since 2019, we have been running the Limata X1000 LDI system (including LUVIR for solder mask imaging) in daily production as an addition to our current process with film. The machine was capable of properly exposing Taiyo PSR-4000 BN (DI) solder mask types on normal to high-copper boards using a new and unique direct imaging process. The machine operating interface is very user friendly which allowed for a quick technical training curve. The pre-registration processing reduced several seconds of production time at every print. Limata support and service staff is incomparable. They supported our team every step of the way at basically any time of the day or night, with literally, an immediate response time, customizing the software interface to best fit our Operations and needs.
We have exposed more than 8,000 prints since end of October, on various solder mask colors and some resist film panels. Limata, has proven to be very capable and innovative. They are a strong contender in the industry.
We have very much enjoyed this project, and working with the team!
Thank you Limata for the continued support and being a part of our growth.”
Bill Sezate
Vice President, GM
Summit Interconnect
As a replacement to our current contact exposure process with film, the LIMATA X2000 system including LUVIR-Technology was capable of properly exposing non-LDI solder mask types using a direct imaging process. The machine offers cutting edge software with a very intuitive operating interface which allowed for quick technician training curve. The dual drawer system combined with pre-registration processing reduced several seconds of production time at every machine cycle. Limata support and service staff is world class. They added software patches to keep production running at shortest possible response times, customized the software interface to best fit our in-house Operations system, and even wrote a step-by-step machine processing manual. As a result of the project, we have exposed more than 16,000 times on various product types and solder mask brands/colors. Limata, in a very short timeframe as a company, has definitely shown they are truly innovative and will be challenging the industry of direct imaging for the top spot.
Kevin Beattie
Process Engineer
TTM Technologies
Forest Grove Division