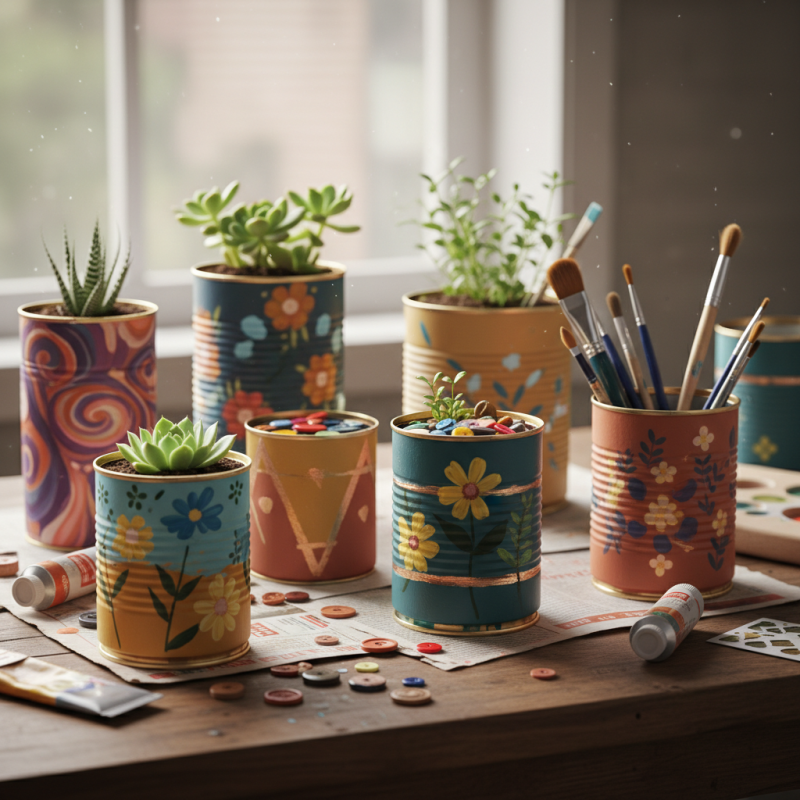
Are you looking for a fun way to explore your creativity? painting tin cans can be an exciting project for both beginners and experienced crafters. With just a few supplies, these ordinary objects can transform into unique art pieces. You can use your imagination to create colorful planters, decorative storage, or eye-catching gifts.
painting tin cans not only provides an outlet for creativity but also promotes sustainability. By repurposing these materials, you contribute less waste to landfills. However, the process can be challenging. Achieving smooth finishes or vibrant colors may require practice and experimentation. Don't be discouraged by initial failures. Every artist faces hurdles, and learning from these struggles can lead to better results.
In this article, we will explore various techniques for painting tin cans. You'll discover tips to enhance your skills and ideas to spark your imagination. With a bit of patience and perseverance, your painted tin cans can become delightful additions to your home or gifts for friends. So, let's dive into the colorful world of tin can artistry!
Painting tin cans can spark creativity in your crafts. To start, gather the materials. You'll need clean tin cans, acrylic paints, paintbrushes, and optional stencils. Prepare a clean workspace. Have some newspaper or a plastic sheet to protect your area.
For paint application, thin coats work best. Apply the first layer and let it dry completely. Using a foam brush can give smoother results. If you want intricate designs, consider using stencils for a professional look. Experimenting with colors can lead to exciting combinations. Don't be afraid to make mistakes; they can often lead to unique designs.
Tips: When using stencils, secure them with tape. This prevents slipping and ensures clean lines. Additionally, try mixing paints to create custom shades. If you find the paint peeling, allow more drying time. Remember to protect your hands with gloves, as paint can be stubborn to remove. Be patient with the process and embrace the imperfections that come with creativity.
Cleaning and preparing tin cans is essential for a successful painting project. Start by removing labels. Soak the cans in warm, soapy water. This helps loosen adhesive residues. Scrub with a sponge to ensure all the remnants are gone. Ensuring a clean surface is crucial. According to a report by the Craft & Hobby Association, 52% of craft failures stem from improper preparation.
Next, rinse the cans thoroughly to eliminate soap. Dry them completely, as moisture can affect paint adherence. Use rubbing alcohol on the exterior. This step can enhance paint durability. Proper surface preparation is not just a recommendation; it is backed by industry studies. Research shows that well-prepared surfaces improve paint longevity by up to 30%.
Inspect the cleaned cans for dents or sharp edges. These imperfections can pose safety risks and affect the final look. Sand any sharp areas for safety. It's okay if the cans still have minor imperfections. These can add character to your painted designs. Remember, even small flaws can tell a unique story in your crafting journey.
When creating art from tin cans, choosing the right paints and brushes is crucial. Acrylic paint is popular among crafters. It dries quickly and offers vibrant colors. However, it may not adhere well to shiny surfaces without preparation. Consider lightly sanding the can’s surface before painting. This prepares the can for better paint adhesion and increases durability.
For brushes, synthetic options are often preferable. They hold acrylic paint well and can be cleaned easily with water. Flat brushes are great for larger areas, while detail brushes work well for intricate designs. However, don’t overlook sponges. They create unique textures that can enhance your project’s appeal.
Tips: Use painter’s tape to create clean lines when adding designs. Experiment with layering colors for more depth. Before painting, test your designs on paper. This helps visualize your final product and reduces mistakes on the actual cans.
Painting tin cans can transform them into charming decor. Patterns and designs add a unique touch. Let’s explore techniques for creative expression.
To start, clean the cans thoroughly. Use soap and water to remove residue. Allow them to dry completely. A base coat helps paint adhere better. Choose acrylic paint for vibrant colors. It is durable and ideal for both indoor and outdoor use.
When applying patterns, use painter’s tape for straight lines. This helps create crisp edges. Stencils are great for intricate designs. Consider using a sponge brush for textured effects. Dabbing the brush lightly creates depth. However, it takes practice to master this technique. Don't be disheartened by initial mishaps; they lead to improvements.
Tips: Experiment with color combos. Don’t be afraid to mix shades. This can yield unexpected and delightful results. Also, remember to seal your painted cans with a clear coat to protect your designs. This process might seem daunting, but each attempt improves your skills. Enjoy the journey of crafting with tin cans.
When it comes to finishing touches for your painted tin cans, sealing is crucial. A good seal protects your artwork from scratches and moisture. Use an acrylic sealer for a glossy finish, or a matte spray for a subtle effect. Apply the sealant outdoors to avoid fumes. This step can feel daunting, especially if you worry about ruining your design. Just remember, practice makes perfect.
Displaying your painted cans adds to their charm. Consider creating an arrangement on a shelf or table. Mixing sizes and colors can create visual interest. For a unique touch, use natural elements like stones or plants around them. If you have kids, involve them in placement to make it a fun family project. They might choose a location that surprises you.
Tips: Test your chosen sealant on a spare can to find your favorite finish. If you notice brush strokes, you may not be using enough sealant. When displaying, ensure they are stable; a tipped can can lead to damage. Reflect on your process. Each can is a lesson in your creative journey. Embrace imperfections as they add character to your work.
| Step | Materials Needed | Technique | Finish |
|---|---|---|---|
| 1 | Empty tin can, acrylic paint, paintbrush | Base coat of paint | Matte finish |
| 2 | Stencils, sponge brush | Apply designs with stencils | Glossy finish |
| 3 | Water-based sealant | Seal the painted area | Durable finish |
| 4 | Twine, artificial flowers | Decorate for display | Creative display |
„Thanks to the LUVIR technology, the solder resist process could be switched directly from the previously used mask exposure to direct exposure. As an outstanding digital solution on the market, this technology has been able to demonstrate fast process times and superior quality on our certified conventional ink in production. This allowed us to fully digitize the solder mask process at low cost – without process or ink adjustments. An excellent benefit to our production in Rot am See.“
Ralf Göhringer (Head of Production WE Rot am See)
I would definitely recommend the Limata machine and team for a future company purchase
Michael Greenaway
Compunetics Inc.
“The Limata ldi has been amazing!! Best thing we did was buy this machine”
Richard Brady
GM
Circuitlabs
“Since 2019, we have been running the Limata X1000 LDI system (including LUVIR for solder mask imaging) in daily production as an addition to our current process with film. The machine was capable of properly exposing Taiyo PSR-4000 BN (DI) solder mask types on normal to high-copper boards using a new and unique direct imaging process. The machine operating interface is very user friendly which allowed for a quick technical training curve. The pre-registration processing reduced several seconds of production time at every print. Limata support and service staff is incomparable. They supported our team every step of the way at basically any time of the day or night, with literally, an immediate response time, customizing the software interface to best fit our Operations and needs.
We have exposed more than 8,000 prints since end of October, on various solder mask colors and some resist film panels. Limata, has proven to be very capable and innovative. They are a strong contender in the industry.
We have very much enjoyed this project, and working with the team!
Thank you Limata for the continued support and being a part of our growth.”
Bill Sezate
Vice President, GM
Summit Interconnect
As a replacement to our current contact exposure process with film, the LIMATA X2000 system including LUVIR-Technology was capable of properly exposing non-LDI solder mask types using a direct imaging process. The machine offers cutting edge software with a very intuitive operating interface which allowed for quick technician training curve. The dual drawer system combined with pre-registration processing reduced several seconds of production time at every machine cycle. Limata support and service staff is world class. They added software patches to keep production running at shortest possible response times, customized the software interface to best fit our in-house Operations system, and even wrote a step-by-step machine processing manual. As a result of the project, we have exposed more than 16,000 times on various product types and solder mask brands/colors. Limata, in a very short timeframe as a company, has definitely shown they are truly innovative and will be challenging the industry of direct imaging for the top spot.
Kevin Beattie
Process Engineer
TTM Technologies
Forest Grove Division